Bird in Hand Farm

Bird in Hand Farm is an imaginary place.


Thursday, August 12, 2010

Yarn swift

Flipped over my desk chair...
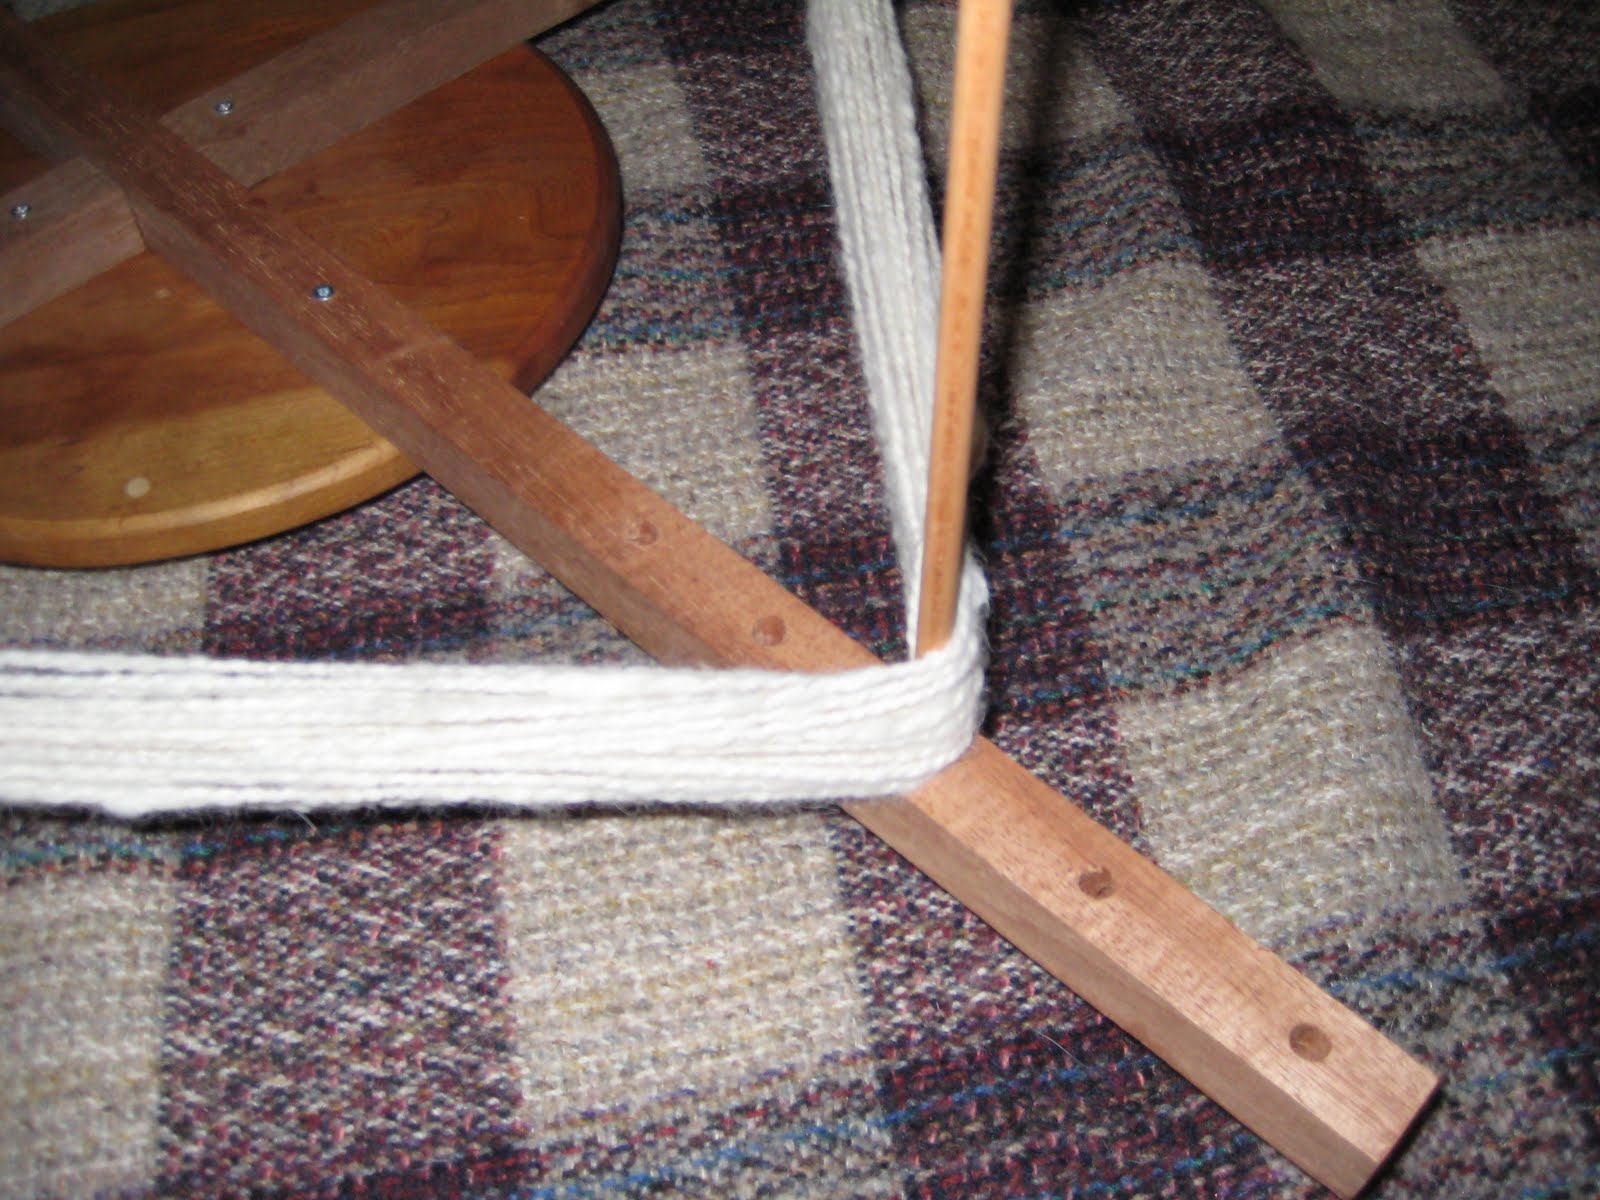
The Farmer loves me.  It's a good thing because it meant that he used to be willing to stand with a hank of yarn over his forearms while I wound it.  I'm sure he preferred it to the alternative of listening to me swear while I tried to wind it off the back of a chair.  Anyway, I'm knitting enough that it was time for a swift.  I looked on-line and they are expensive!  Way expensive.  I tried a few improvised solutions with limited success.  I finally decided to make my own.

Supplies:
1 old wood lazy Susan
6' of 1"x1" trim
8 - 1.5" wood screws
1 - 3/8" dowel

Total cost: $15 

1. Cut the 1"x1" trim in half, and then cut one of the halves in half again.  

2. Drill several 3/8" holes along the trim piece.  Space them 2" apart. Try not to drill all the way through.  We used a piece of masking tape to mark the depth on the drill bit.
3. Screw the 1"x1" trim to the lazy Susan making sure that the holes are facing up.  Don't ask.

4. Cut the dowel into four equal lengths, each approx 9" long.

It works brilliantly.  The dowels can be placed however far apart is needed for the hank to be snug.  It spins freely and allows me to wind a ball at my own pace. 

Wednesday, August 11, 2010

Scrappy Soap

My favorite soap of all time is a cobblestone batch (on the right) I made out of unscented goats milk and chunks and scraps off all the other batches I had made before.  The chunks were all different scented soaps, but in the context of the plain goats milk, the final scent just smells clean.  It has great bubbles but is not at all drying.  It made a huge batch, so almost 3 years later, I still have a few bars.  I got the idea from a bar (on the left) that I had bought at the Wind Mill Market in Penn Yan years ago.  I loved the bar and spent $5 or $6 for it, but never used it.  It was too special.

I had 4# of soap scraps - the slivers of bars from the shower, trimmings, and end pieces from the loaf and tube molds.  I think I am just about set for soap for the winter, so this will probably be the last batch of the year.  I'm using Dr. Bob's Basic Four Oil Soap II recipe.

Step 1: Grate the scraps.  I decided to go with a grated consistency this time.  I want to see what it is like.  Some scraps were pretty old and pretty hard.  I was afraid of burning out the salad shooter, so I hand grated some or it.

Step 2: Got the goats milk out of the freezer to defrost the night before..

Step 3: Measure the oils.  I didn't have enough coconut oil or palm oil.  I wound up using up all of the leftover soap oils in the house: palm kernel oil, Shea butter, almond oil, cocoa butter, and a pound of lard. I know that different oils have different saponification values, and ideally you should run it through a calculator to make sure you are still within range.  But there is a pretty big range to work with and these were pretty small percentages of the whole batch, so I decided to wing it.  But I admit, that's risky and best practice is to always use a lye calculator.

Step 4: Dissolve lye in the semi frozen goats milk slush.  This time it turned bright orange.  I've read about that happening, but have never experienced it.  Usually, it is a creamy yellow.

Step 5: Mix the lye and the oils.  It filled my soap pot.  It came to trace really easily.  I turned around to help line the molds and it was done.  Maybe it traced so easily because it is such a large batch.  No scent again because I did not want it to clash with the scents in the scraps.

Step 6: Pour into the molds adding the soap shreds.  Stir and tap to incorporate and release air bubbles.  I used the wood log mold that the farmer made me and a cardboard box lined with a grocery bag.  I have the box pushed up against the wall and braced with the log mold so the long sides don't bow out.

I checked it in half an hour and the big box mold has a heat heave in it.  You can see the steam under the plastic of the bag around the edges due to the heat.  I put it on a wire rack to help it cool.

Step 7: Time to un-mold  and cut it.  It is plenty hard enough.  Ten hours isn't that long, but it is the texture of firm cheese and cut smoothly.  I was hoping for a somewhat whiter bar but with all the oils I used and the orange goats milk, you get what you get.  I got 53 bath sized bars.  I used a wavy putty knife I found at a hardware store to cut it.

Step 8: Find a place for all of this soap to cure for 6 weeks...

I love that I can make something so wonderful out of things that a could be considered discards.


Tuesday, August 10, 2010

Ta Da!

Finally. 

We went to get it Monday night.  We walk in and the guy says, "This will take 5 min."  I say: "I need to drive it and take a good look at it first."  He says "Okay", but did he really think I would just sign on the dotted line on a car I have not had a chance to drive or  inspect?  It drives just fine.  We came back, signed a dozen or so documents and I drove it home.  I still like it.

What we did well:  We researched.  The internet is a wealth of information.  We did lots of test drives.  The car buying service was great.  It was a thought out decision. We got exactly what we asked for at the price we asked for it.  We didn't have to sit there through negotiation and wait forever while the sales guy says "Let me run that by my manager."  We all know he is really going for a cup of coffee because it gives him a psychological advantage to make me wait.

What was so so: There was still a lot of emotion in the decision making.  We agreed to purchase a car sight unseen (there were pics but it is not the same).  We forgot to ask for the carfax for a day.  I felt bad that we did not buy from the sales guy that I liked.  We are at the max limit of our budget.  We probably could have found a reliable vehicle for 5k less.  We got a 2009 red, stick shift, Pontiac Vibe with the bigger engine for $14k out the door.  I think that is a decent price. 

What we screwed up: So far, nothing.  In the past, I have always driven off the lot feeling exhausted and like a schmuck.  I drove away tired and headache-y but I think we paid a fair price.

Now back to your regularly scheduled programming of...

"I can make that!"

Monday, August 9, 2010

Peach Butter

Rory bought the baseball bat zucchini
Rory and I went be-bopping around the Tompkins county countryside on Friday.  We saw a hand printed sign for peaches with an arrow.  Works for us.  I love peaches.  Wegmans had them for $1.49 a pound.  These guys had half a bushel for $13.50, or a full bushel for $21.50.  Then Rory uses a phrase I have never heard before: "peach butter.'

***Cue angelic music and a beam of light shining down.***

In the food mill
I bought half a bushel.

Why have I never heard of this?  I looked online and found dozens of recipes.  The one I picked used a ratio: 5 large peaches to 1/2 cup if water and one cup of sugar.  East European Food Peach Butter

The recipe suggests pitting the peaches, boiling them for 20 min and then using a food mill instead of slip peeling the peaches.  I though it would be easier.  Meh.  I'll try slip peeling next time.

Up to the rim
I get it into the crock pot and it fills it up to the rim.  I put the top on tipped so that steam can escape and go off to knitting.  Three hours later, the butter is no where near butter.  It cooks all day, no where near butter.  We go to the ball game.  Come home and it is still no where near butter.  Maybe the crock pot is too open?  I go back and start reading recipes.  They talk about boiling in the crock pot.  This stuff is not boiling.  I decide to let it rip overnight on low.

Yippie.  Lots of steam.
In the morning it looked like hell.  But the taste was not bad.  Pretty darn good in fact.  I decide to press on.  I dumped it into one of the farmer's sauciers and boiled like mad.  It was like peach napalm.  The splatters were unreal.  I was using the lid like a shield.  At one point the farmer came in and looked at what was left in the crock pot.  "Ick" he said.  "Yeah, but taste it" , I replied.  He did and despite laughing, he agreed that it was good.  It is a dark mahogany color, but that's what color the online pics are too.

9 jars!
27 hours after starting I ladled it into lots of different sized jars and put them back into the bath. While we were out at the movies, every one sealed.

If I ever do this again, I will probably make the commitment to hang out in the kitchen with it stirring for an hour and a half . 

I'm not sure I'm confident enough in this batch to gift them.  It's a really good thing that I like peaches.

Sunday, August 8, 2010

Making a critter

When I re-taught myself to crochet, I used Debbie Stoller's The Happy Hooker as a guide.  One of my favorite patterns from the book is Bedfellows by Camilla Engman.  When I stopped quilting, it became my 'go to' baby present project for coworkers and friends.  I have made 10 of them (!)

As usual, this baby present is late.  Here is the one I made for this baby's older brother a few years ago.  As you can see, my bear does not really look like a bear.  The face is more mouse like.  I made it in stripes because I was using up the blue and red yarns and did not want to run out in an awkward place.

It usually takes me about a week to make a critter.  There have been too may distractions lately, so this one took longer.  She was worth the wait.
Day 1: Picked out the yarn from my stash, bought a skein of white from Michael's (50% off coupon!).  Made and stuffed the body.  Cleaned up the yarn tails.  I'm going to do stripes again.  All the yarn is acrylic so the critter will be easily washable.

Day 2: Crocheted 16 rounds of the face.  She has a pointy nose.

Day 3: Crocheted 3 more rounds on the face.  My hands are not used to crochet and are a bit achy.

Day 4: 5 more rounds on the face....

Day 5: Nada.  Busy with work, car shopping, soaping, and packing  up baby blankets.  I need to make more money and work less so I can have more time to goof off.

Day 6: Placed the nose and eyes.  I's fun.  It goes from being this weird lumpy thing to a face.  The faces can be so expressive.

Day 7: Did a few rounds on the head.

Day 8: Finished the head.

Day 9: Made an arm. 

Day 10: Made a second arm and a pink foot.


Day 11: One and a half legs done.

Day: 12: Finished!  Went to Saturday morning knitting.  While there, I finished the second leg, sewed on her head and limbs, and made and sewed the ears.  Later in the day, I made her scarf and tail.  Since she turned out to be a mouse, I made an I-cord tail.  I started with a double strand on 5 stitches and slowly tapered it down.  It looks pretty darn mouse like.


On Monday, she will go to her new home.


Saturday, August 7, 2010

Buying a Car Steps 13-22

Monday:

Step 13: Call Credit Union Car Buying Service.  Tell him we have narrowed it down to the: Honda Fit, Scion xB (toaster-mobile), or Pontiac Vibe.  Looking for '08 or '09.  Manual transmission.  Bonus points if it is red.  Gave him the budget. 

Step 14: Call credit union car loan lady to extend car loan authorization as it expires on the 6th.  Leave message. 

Tuesday:

Step 15: Look online for xBs, Vibes, and Fits within 75 miles.  Find a red, stick shift, 2010 Vibe with 10,000 miles on it just a bit over our price range.  Drool on keyboard.  It is within 75 miles as the crow flies but you cannot get there from here.  It's at least 90 miles away in the middle of nowhere....  One hour and 51 minutes. 

Wednesday:

Step 14: Car buying service calls back with three really promising cars in our budget, including a red, stick shift Vibe with 10,000 miles.  But it's in Vermont.  Maybe they will bring it to one of their sister dealerships in NY.  

Step 15: Leave another message for credit union loan lady.

Step 16: Do rock-paper-scissors to see if we are getting the toaster mobile or the vibe.  Okay, not really.  We reviewed our notes, and went back on line.  We picked the Vibe.

Thursday: 

Step 17.  Sick the car buying lady on the dealership.  She gets them to bring it to within an hour's drive of us and gets a final price with tax, tags, and fees that is within our budget.

Step 18: Play phone tag with credit union lady.  Getting annoyed.

Step 19: Deal with guy from the dealership.  He says the plates are not included in the negotiated price.  Is he nickle and dime-ing me?

Friday:

Step 20: Finally get the car loan lady.  Get the insurance stuff sent to her.  Confirm the loan and set up a time to go get it.

Step 21: Car buying service confirms that the tag fee is legit.  

Step 22: Get the Carfax from the dealership - should have asked for that yesterday...   Arrange to pick it up next week.  His manager forgot to tell him that they were bringing it into New York.  


That was only 3 steps but it took 9 phone calls to accomplish.


I am so ready for this to be done.


Friday, August 6, 2010

Carrots

No one in this house is a big fan of carrots by themselves.  Especially cooked.  But, in the winter they are an indispensable ingredient in soups and stews.  We buy a bunch when stew is on the menu.  Then they sit in the crisper.  And sit.  And sit.  At some point they rival Rory for their ability to do yoga poses.  At that point, they get tossed into the compost.

Carrots came in the box last week.  I ate one.  We shredded one for the potato-zuke pancake.  That left a lot of carrots.  We finally learned how to blanch and freeze them.  I'm embarrassed to admit I have never done this before.  It is wicked easy.  If you have done this, pat yourself on the back for your practicality.  If you haven't, but think maybe you could; read on.

Step 1. Peel and chop carrots.

Step 2. Put in pot of boiling water.  Boil covered for 2-3 min.

Step 3. Drain and plunge in ice water for 2-3 min.

Step 4. Drain again and pick our the cubes.  Put in a bag, squeeze out air and freeze.

We will never have yoga carrots again.